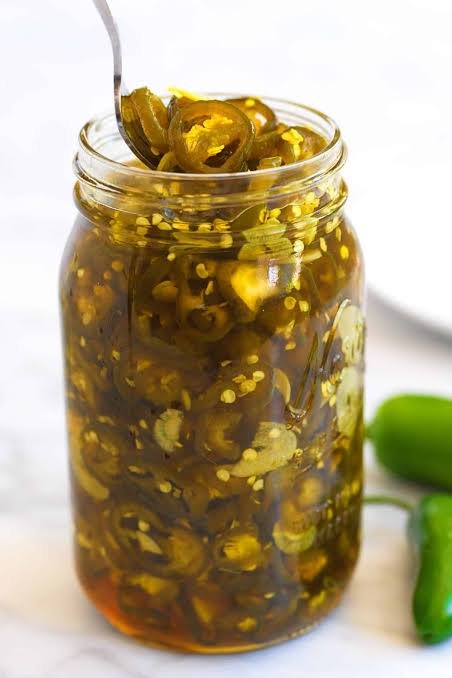
Welcome to the ultimate guide on how to make and preserve your very own homemade cowboy candy through a simple canning process that brings sweet and spicy magic right into your kitchen pantry. Cowboy candy is simply fresh jalapeno peppers that are sliced into neat little rounds and then slow cooked in a rich and flavorful syrup made from granulated sugar and apple cider vinegar along with a few special spices. When you seal these peppers in jars using water bath canning methods you lock in a crunch and flavor that lasts for months so you can enjoy them all year long. This recipe takes ordinary garden peppers and transforms them into a gourmet condiment that you can spoon over burgers or add to cheese boards and tacos whenever you want to elevate a meal. If you love bold flavors that wake up your taste buds without being overwhelmingly hot then this preservation project is going to become your new favorite weekend kitchen adventure.
People absolutely fall in love with cowboy candy because it offers an incredible balance of fiery spice and comforting sugary sweetness that plays wonderfully on your tongue with every single bite. The magic happens when the hot sugar syrup penetrates the pepper rings and tames the sharp raw heat of the jalapenos while keeping a pleasant crisp texture that refuses to turn mushy. You will find yourself reaching for these golden green rings to top your grilled hot dogs or mixing them into your homemade barbecue sauces and potato salads for an unexpected burst of excitement. Food lovers everywhere adore this recipe because it is surprisingly easy to make with just a handful of basic ingredients that you can find at any local grocery store or farmers market. Once you experience the addictive combination of sweet syrup and spicy pepper you will understand why home canners and backyard grill masters always keep multiple jars stocked on their shelves.
You should consider making a big batch of this delicious cowboy candy whenever you harvest an abundance of fresh peppers from your garden or find a great sale at the local vegetable stand during peak summer months. Making these preserved peppers is a wonderful emotional anchor that connects you to traditional home cooking and brings a warm sense of accomplishment when you hear the lids pop as they seal on the counter. From a taste perspective nothing beats the vibrant punch of homemade preserves compared to store bought alternatives that often contain artificial preservatives and lose their fresh crunch during mass production. Furthermore if you are following a clean eating lifestyle or watching your processed food intake you will love knowing every single natural ingredient that goes into your preserving pot. Preparing these jars on a cozy Sunday afternoon fills your entire home with a mouthwatering aroma and sets you up with fantastic gifts to share with your neighbors and foodie friends during the holidays.
Preserving food through water bath canning is a wonderful skill to learn because it empowers you to take control of your food supply and enjoy seasonal harvests long after the growing season has ended. As you slice the peppers and dissolve the sweet syrup on your stove you are participating in a time honored culinary tradition that has been passed down through generations of home cooks who cherished self sufficiency. The process requires patience and attention to detail but the reward of seeing rows of gleaming glass jars filled with bright green pepper rings shining in your pantry is truly unmatched. Whether you are a complete beginner who has never touched a canning jar before or an experienced home cook looking for a fun new project this recipe welcomes you with open arms. Dive into this journey with confidence and prepare to create a batch of spicy sweet goodness that will impress your family and transform your everyday meals into extraordinary culinary feasts.
Ingredients You Will Need
Three pounds of fresh firm green jalapeno peppers washed and sliced into quarter inch rounds with the stems discarded Two cups of granulated white sugar to create the sweet syrup base that balances the heat of the peppers One cup of apple cider vinegar to give the syrup a bright and tangy flavor profile that preserves the freshness One teaspoon of turmeric powder to provide a gorgeous golden color to the syrup and enhance the visual appeal One teaspoon of celery seed to add a subtle earthy depth and traditional pickling aroma to the mix One half teaspoon of garlic powder to introduce a savory background note that rounds out the sweetness and spice One half teaspoon of ground ginger for a warm and aromatic touch that elevates the overall flavor complexity
Step by Step Method
Start your canning journey by washing all of your fresh jalapeno peppers thoroughly under cold running water to remove any dirt or residue from the farm or garden. Slice off the top stem end of each pepper and discard it before cutting the remaining pepper body into neat quarter inch thick rounds. You may want to wear kitchen gloves while handling and slicing the peppers to protect your skin and eyes from the natural oils that cause irritation.
Place a large heavy bottomed pot on your stove over medium heat and pour in the granulated white sugar along with the apple cider vinegar. Add your turmeric powder and celery seed and garlic powder and ground ginger directly into the liquid mixture in the pot. Stir the ingredients continuously with a wooden spoon until the sugar completely dissolves and the liquid begins to simmer gently around the edges.
Add your sliced jalapeno peppers into the simmering sweet vinegar syrup making sure they are all submerged in the flavorful liquid. Turn the heat down slightly and let the peppers simmer gently in the syrup for about four minutes until they change color slightly and absorb some of the liquid. Remove the pot from the heat source and use a slotted spoon to transfer the hot pepper slices into your prepared clean glass canning jars.
Turn the heat back up under the remaining syrup in your pot and let it boil rapidly for about six minutes until it reduces and thickens slightly into a rich glossy sauce. Carefully pour the hot reduced syrup over the pepper slices in each jar leaving about one half inch of headspace at the top of every jar. Take a clean damp cloth and wipe the rims of the jars to remove any sticky syrup residue that might prevent a proper seal.
Place the flat metal lids onto the jars and screw the metal bands on until they are fingertip tight so air can escape during the processing phase. Lower your filled jars into a large water bath canner filled with boiling water making sure the water level sits at least one inch above the tops of the jars. Process the jars in the boiling water bath for fifteen minutes to ensure proper preservation and safety for shelf storage. Carefully lift the jars out of the water using jar lifter tongs and place them on a thick towel on your kitchen counter without disturbing them for twenty four hours. Check the seals by pressing the center of each lid after twenty four hours and store your sealed jars in a cool dark pantry for long term enjoyment.
Why This Recipe Is Special
This unique recipe stands out because it strikes the perfect harmony between fiery pepper heat and luscious candy like sweetness without letting either flavor overpower the other. The health benefits of using fresh jalapeno peppers include a generous dose of vitamin C and capsaicin which is known to boost metabolism and support overall wellness in your daily diet. Unlike heavy commercial condiments loaded with chemical additives this homemade version relies entirely on simple pantry staples and natural vinegar to maintain its shelf life safely. The vibrant taste profile makes it an incredibly versatile addition to your culinary toolkit because it cuts through rich foods and adds brightness to savory meals instantly. Furthermore the joy of gifting a jar of homemade cowboy candy to someone special brings a personal touch that store bought items simply cannot replicate.
Extra Tips for Better Taste
If you prefer a milder flavor profile you can slice your jalapenos in half and scrape out the white membranes and seeds before cutting them into rounds for your pot. Experiment with adding a small cinnamon stick or a few whole cloves into your syrup while it simmers to introduce a warm winter spice dimension to your preserves. Always allow your canned jars to rest in your pantry for at least two weeks before opening them so the flavors can meld together and mature into perfection. If you want an extra crunch make sure your fresh peppers are completely firm and avoid overcooking them during the initial simmer phase on your stove. You can also save the leftover spicy syrup in your empty jars and use it as a glaze for roasted chicken or pork chops to minimize kitchen waste.
Final Thoughts
Making your own cowboy candy at home is a wonderfully rewarding project that brings immense satisfaction and fills your kitchen with delightful aromas from start to finish. We hope this comprehensive guide inspires you to roll up your sleeves and try water bath canning for yourself so you can enjoy the fruits of your labor all year long. Remember that cooking and preserving are skills that improve with practice and every batch you make will bring you more confidence and delicious results in the kitchen. Enjoy sharing these sweet and spicy pepper rings with your loved ones and let this recipe become a cherished tradition in your culinary repertoire. May your pantry always be full of vibrant flavors and your cooking journey be filled with endless joy and delicious discoveries.
Nutrition Details
Nutrition Table for Cowboy Candy
Serving Size: One quarter cup serving Calories: Sixty calories per serving Total Fat: Zero grams Sodium: One hundred milligrams Total Carbohydrates: Fifteen grams Dietary Fiber: One gram Sugars: Thirteen grams Protein: Zero grams
Disclaimer
Please remember that individual health needs and dietary responses vary greatly from person to person depending on personal metabolism and underlying health conditions. The nutritional information provided in this article is an estimate calculated for general guidance purposes only and should not replace professional medical advice. Always consult with a qualified healthcare provider or registered dietitian before making significant changes to your daily diet or food preservation practices.