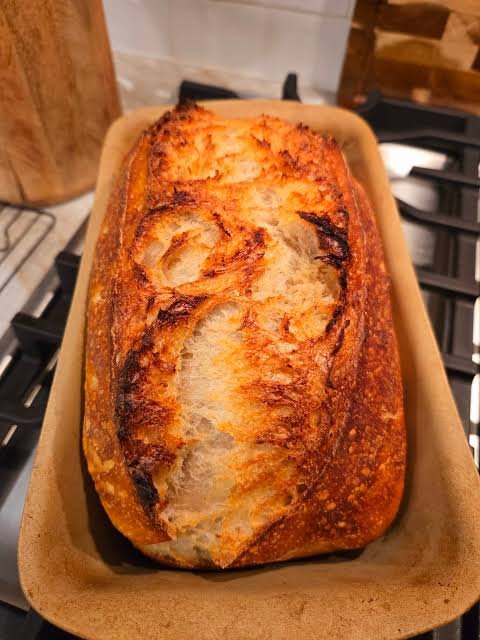
Baking fresh bread at home brings a wonderful feeling of comfort and warm joy to any kitchen. This particular sourdough stoneware loaf guide is all about helping you create a golden and crispy loaf of natural bread right in your own home oven using simple stoneware baking tools. Sourdough baking relies on natural wild yeast and friendly bacteria rather than quick store bought active yeast packets, which gives the finished loaf a deep flavor profile alongside a delicate chew. When you bake this natural dough inside a preheated stoneware baker or upon a heavy stone baker surface, the heat surrounds the dough evenly and traps the rising steam. This rich steam allows your dough to expand to its maximum height while creating a shiny surface that later bakes into a delightful crust. Every step of this traditional recipe is designed to help you transform basic ingredients like flour, pure water, and natural starter into a glorious round or oval loaf that looks like it came straight from an artisan bakery window.
People around the world absolutely fall in love with this baking style because it combines simple traditions with incredible sensory results. The smell of wild yeast dough slowly rising on your kitchen counter brings a quiet sense of calm and connection to real food culture. As the bread bakes inside the stoneware baker, your entire home fills with a rich nutty aroma that makes everyone gather in the kitchen waiting for the warm loaf. Beyond the amazing smell, people cherish the unique texture that only natural sourdough baking can provide to home cooks. The outer crust turns deeply golden and cracks softly as it cools down, offering a pleasant crunch with every single bite you take. Inside the loaf, you will find a soft and airy crumb structure that holds spreads smoothly without falling apart easily. It creates a satisfying eating experience that modern factory produced commercial white bread simply cannot match, making the small effort spent baking completely worthwhile for food lovers.
You can decide to bake this wonderful homemade sourdough stoneware loaf whenever you want to bring a special sense of warmth and comfort into your weekly family routine. It is ideal for quiet weekend baking sessions when you have time to watch the dough gently rise and develop its complex natural flavors. Making this bread serves as a great wellness activity because kneading and folding soft dough helps lower stress while focusing your mind on a slow creative craft. From a pure taste perspective, this rustic loaf is the ultimate partner for cozy winter soups, morning breakfast butter spreads, or fresh sandwich ingredients. If you are mindful of your physical health and digestion, you will also appreciate that long natural fermentation breaks down heavy starches and gluten proteins in the flour. This process makes the bread much easier on your stomach while providing clean lasting energy without quick sugar spikes, making it a brilliant addition to a balanced whole food diet.
Starting your journey into artisan bread baking might feel like a big project at first glance, but using stoneware equipment simplifies everything for beginners. Stoneware acts as a natural shield that distributes high heat gently around your loaf so the bottom does not burn before the top gets nice and brown. You do not need any fancy chemical additives or complex machine tools to achieve professional results right in your standard home kitchen. All you need is patience, a healthy active sourdough culture, good quality unbleached flour, clean water, and pure sea salt. As you practice making this recipe, you will build a natural feel for how dough changes texture during mixing, resting, shaping, and final baking. Reading through the simple instructions below will give you all the confidence required to bake your very first successful batch, bringing fresh baked happiness into your home week after week.
Ingredients You Will Need
To make one large sourdough stoneware loaf, gather the following exact ingredients:
- Active sourdough starter that is fully fed and bubbly: 100 grams
- Unbleached bread flour with high protein content: 400 grams
- Whole wheat flour for extra flavor and depth: 100 grams
- Pure lukewarm water without chlorine: 350 grams
- Fine sea salt or unrefined salt: 10 grams
- Rice flour or semolina flour for dusting the shaping basket: 30 grams
Step by Step Method
Step 1: Feeding Your Starter
Make sure your sourdough starter is active and healthy before you begin mixing your dough. Feed your starter with equal parts flour and warm water about four to six hours before starting the bread recipe. Place the container in a warm spot in your kitchen until the starter doubles in size and shows lots of bubbles on top. You can test if it is ready by dropping a small spoonful of starter into a cup of room temperature water. If the spoonful floats gently on top of the water, your wild yeast is ready to bake bread.
Step 2: Mixing the Water and Flour
In a large glass or ceramic mixing bowl, combine your active sourdough starter with three hundred fifty grams of lukewarm water. Use your clean hands or a wooden spoon to stir the liquid until the starter dissolves completely and looks like milky water. Add four hundred grams of unbleached bread flour along with one hundred grams of whole wheat flour into the bowl. Mix everything together until all the dry flour disappears and a shaggy dough forms. Cover the bowl with a clean damp kitchen towel and let it rest undisturbed for thirty minutes so the flour can fully absorb the water.
Step 3: Adding the Salt
After the initial resting period passes, sprinkle ten grams of fine sea salt evenly over the top of your wet dough. Splash a few drops of extra water over the salt to help it dissolve smoothly. Work the salt into the dough by pinching the mass gently with your fingers and folding the edges over the center several times. The dough will start to feel slightly firmer and smoother as the salt mixes in completely. Cover the bowl again with your damp towel and prepare for the stretching phase.
Step 4: Stretching and Folding
Instead of heavy traditional kneading, this soft bread uses a gentle stretch and fold method to build strength in the gluten network. Every thirty minutes for a total of two hours, perform one set of stretches. To do a set, wet your clean hand with water, reach down to the bottom of the bowl, grab one side of the dough, stretch it upward gently without tearing it, and fold it over the top toward the opposite side. Rotate your bowl ninety degrees and repeat this action on all four sides. You will complete four full sets of stretches over the two hour timeframe, watching the dough become smooth, silky, and elastic.
Step 5: Bulk Fermentation
Once your four sets of stretches are finished, cover the bowl tightly with plastic wrap or a secure lid. Leave the dough sitting at comfortable room temperature to undergo its main rise, which is called bulk fermentation. Depending on how warm your kitchen is, this step usually takes anywhere from three to five hours. Look for the dough to increase in size by about fifty to seventy percent. It should look light, feel puffy when touched gently, and show small air bubbles trapped just underneath the smooth top surface.
Step 6: Shaping the Loaf
Lightly sprinkle your clean kitchen counter with a little bit of bread flour. Gently tip your puffy dough out of the bowl onto the counter, taking care not to pop all the delicate internal gas bubbles. Dust your hands with flour and gently stretch the dough into a flat square shape. Fold the left side into the middle, then fold the right side over the left side like a letter. Roll the dough up tightly from the top down to form a smooth round ball or oval shape. Pull the dough gently toward yourself across the bare counter to build light outer surface tension on the ball.
Step 7: Final Proofing
Dust a woven proofing basket or a medium bowl lined with a clean cotton towel using rice flour or semolina flour. This special dusting prevents the wet dough from sticking to the sides during its final rest. Carefully lift your shaped dough ball using a bench scraper or floury hands and place it upside down into the prepared basket, so the smooth top side rests against the bottom. Cover the top with a cloth towel and place the basket inside your refrigerator for twelve to sixteen hours for a cold overnight proof. Cold proofing slows down yeast growth while letting natural acids build deep sourdough taste.
Step 8: Preheating the Stoneware
The next morning, place your heavy stoneware baker or stoneware pot with its lid on inside your cold oven on the middle rack. Turn your oven heat up to two hundred thirty degrees Celsius or four hundred fifty degrees Fahrenheit. Let the empty stoneware preheat inside the hot oven for at least forty five minutes to an hour so the stone material absorbs deep heat. High heat stored in the stoneware is the secret key to getting a big rise and a crispy crust on home baked bread.
Step 9: Scoring the Dough
Carefully take your cold proofed dough out of the refrigerator right before you are ready to bake. Cut a piece of parchment paper slightly larger than your bread basket. Lay the parchment paper over the basket and flip everything upside down so the dough rests gently on the paper. Lift the basket away to reveal your cold shaped loaf. Dust the top of the dough lightly with a small amount of extra flour. Use a razor blade or sharp kitchen knife to cut a smooth slash about one centimeter deep down the middle of the loaf. This score allows steam to escape controlled so the bread expands evenly.
Step 10: Baking in Stoneware
Wearing thick oven mitts, carefully pull the hot preheated stoneware baker out of your oven and remove its heavy lid. Lift the dough by holding the corners of the parchment paper and lower it gently into the hot stoneware base. Put the lid back on the stoneware baker immediately to trap the rising moisture. Place the covered stoneware back into the hot oven and bake for twenty minutes with the lid closed tight. After twenty minutes, carefully remove the lid to let the steam out. Lower the oven temperature slightly to two hundred fifteen degrees Celsius or four hundred twenty degrees Fahrenheit and bake uncovered for another twenty to twenty five minutes until the crust turns a rich golden brown color.
Step 11: Cooling Down
Remove the stoneware baker from the oven using protective mitts. Lift your beautiful finished sourdough loaf out of the hot stone dish using the parchment paper edges and place it onto a wire cooling rack. Resist the temptation to cut into your hot loaf right away, as the inside crumb structure is still finishing its final cooking process through internal steam. Let the bread cool down completely at room temperature for at least two full hours before slicing with a serrated bread knife.
Why This Recipe Is Special
This homemade sourdough stoneware loaf stands out because it blends old world fermentation methods with modern home kitchen convenience. Using stoneware creates an ideal microclimate inside your standard home oven, mimicking the heat absorption and steam retention found in massive commercial stone deck ovens. The natural steam released by the wet dough gets trapped underneath the closed stone lid during the early minutes of baking. This prevents the outer skin of your dough from hardening prematurely, allowing the loaf to expand freely to its full height while keeping the inside crumbs light and fluffy.
From a health and body perspective, wild fermented sourdough offers fantastic benefits that simple commercial yeast breads cannot provide. The long slow fermentation process allows natural beneficial bacteria to break down complex wheat proteins like gluten as well as phytic acid, which is an antinutrient that can block mineral absorption in your gut. As a result, many people find that natural sourdough is far gentler on their digestive systems and easier to digest comfortably. Additionally, the low glycemic index of sourdough helps prevent sharp spikes in blood sugar levels, keeping your energy steady throughout the day.
When it comes to pure taste, this recipe creates an unforgettable flavor profile that balances subtle sour tang with rich toasted grain notes. The combination of high quality bread flour and whole wheat flour delivers a deep nutty foundation that pleases every palate. The contrast between the crunchy outer shell and the soft bouncy center turns every slice into an enjoyable meal experience. Whether enjoyed plain with fresh creamy butter or built into a hearty sandwich, this bread elevates simple daily eating into a special comforting treat.
Extra Tips for Better Taste
- Add a small dish of water on the bottom rack of your oven while preheating to create an even steamier baking environment inside the oven chamber.
- Sprinkle toasted sesame seeds, poppy seeds, or pumpkin seeds on top of the shaped loaf right before placing it into the baking basket for added crunch.
- Replace fifty grams of the water with fresh cold milk or olive oil if you desire a slightly softer crust and a tender crumb texture.
- Mix fine fresh herbs like chopped rosemary or thyme into the dough during the second stretch and fold for an aromatic herb loaf.
- Fold in small cubes of sharp cheddar cheese and diced jalapeños during the final stretch for a savory specialty loaf that goes great with spicy foods.
- Store your sliced cooled bread cut side down on a wooden cutting board or inside a breathable paper bag to maintain the perfect crisp crust for days.
- Freeze individual slices of fully cooled bread in a sealed freezer bag, so you can pop them directly into your toaster whenever you want a quick fresh slice.
Final Thoughts
Baking your own sourdough stoneware loaf is a deeply satisfying kitchen journey that rewards your time with incredible taste, rich aroma, and wholesome nutrition. While the total process takes hours from start to finish, most of that time is completely hands off while nature does the heavy lifting of fermenting the dough. Do not feel discouraged if your very first attempt is not visually perfect, because every single loaf you bake will help you learn the feel of the dough. Gather your simple ingredients, warm up your stoneware baker, and enjoy the magical process of turning flour and water into magnificent artisan bread right at home.
Nutrition Details
Here is the estimated nutritional breakdown for the total sourdough stoneware loaf recipe as well as a standard single serving calculated based on ten equal slices per loaf:
| Nutrient | Total Recipe Amount | Per Serving (1 Slice) |
| Calories | 1750 kcal | 175 kcal |
| Carbohydrates | 360 grams | 36 grams |
| Dietary Fiber | 25 grams | 2.5 grams |
| Sugars | 4 grams | 0.4 grams |
| Protein | 55 grams | 5.5 grams |
| Fat | 6 grams | 0.6 grams |
| Saturated Fat | 1 gram | 0.1 gram |
| Sodium | 3900 milligrams | 390 milligrams |
| Potassium | 650 milligrams | 65 milligrams |
Disclaimer
Please keep in mind that everyone’s body, health conditions, and digestive systems are unique. Individual health results and digestive comfort from eating fermented foods like sourdough can change from person to person. The nutrition values provided above are estimations based on standard ingredients and may vary slightly depending on the specific flour brands or starter activity level you use in your kitchen. If you have specific medical conditions, severe gluten allergies, or celiac disease, please consult with a qualified health professional or doctor before introducing new homemade foods into your diet routine.