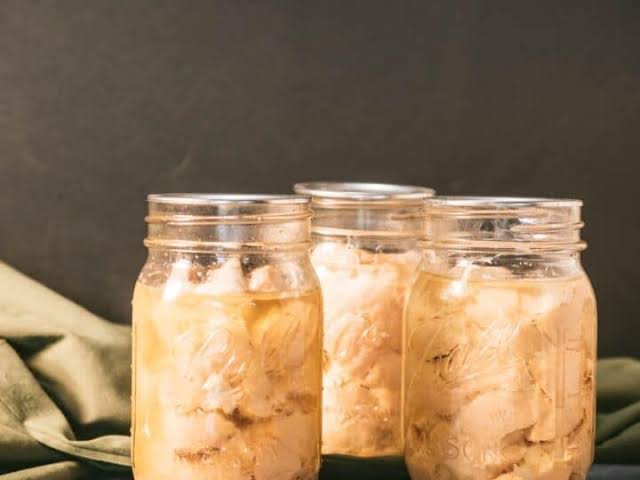
Home cooks, busy parents, and fitness enthusiasts absolutely love this recipe because it saves huge amounts of time and energy every single week. When you buy chicken breast in bulk during market sales, you save a lot of money, but freezing large quantities of meat can quickly crowd your freezer space and lead to freezer burn. Canning solves that entire problem by transforming fresh raw chicken into shelf stable pantry goods that take up zero freezer room. When you pop open a sealed jar, the chicken is extraordinarily soft and tender because it has been gently pressure cooked right inside its own natural juices. The meat practically falls apart with a fork, making it ideal for fast tacos, warm soups, creamy chicken salads, or quick casserole dishes. Every jar represents pure convenience that makes meal preparation an absolute joy rather than a stressful daily chore.
There are so many wonderful reasons and special moments to make your own canned chicken breast at home. From an emotional perspective, building a long term home food supply gives you incredible peace of mind and confidence during unexpected power outages, stormy weather, or sudden financial changes. From a taste perspective, store bought canned meat simply cannot compare to the clean, fresh flavor of homemade jars seasoned with your favorite sea salt or simple herbs. From a health and fitness perspective, chicken breast is one of the purest sources of lean protein available to help build muscle, lose body weight, and maintain steady energy levels throughout the day. Having instant access to clean cooked protein keeps you from ordering unhealthy fast food when you feel tired after a long day of work or exercise.
If you are a complete beginner to home food preservation, there is absolutely no need to feel nervous about trying this process today. Canning meat does require a proper pressure canner because chicken is a low acid food, but the steps themselves are remarkably easy to follow once you understand the basic mechanics. You simply cut the fresh meat into bite sized pieces, place them inside clean glass jars, add a little sea salt if you like, seal the lids, and let the pressure canner do all the heavy lifting for you. In this complete step by step guide, we will walk through every single detail together so you feel totally comfortable and successful. You will learn the exact measurements, the right processing times, safety measures, and creative ideas to turn simple chicken breasts into unforgettable family meals.
Ingredients You Will Need
To prepare a full batch of home canned chicken breast, gather the following simple ingredients and equipment:
-
Fresh boneless skinless chicken breasts: 10 pounds (4.5 kilograms)
-
Canning salt or non iodized sea salt: 4 teaspoons (20 grams total, or 1/2 teaspoon per pint jar)
-
Clean water or warm homemade chicken broth: 4 cups (950 milliliters) optional if using the hot pack method
-
Clear lemon juice or white vinegar: 2 tablespoons (30 milliliters) for wiping jar rims clean
Step by Step Method
Step 1: Clean and Prepare Your Equipment
Start by thoroughly washing your glass canning jars, metal bands, and brand new canning lids in warm soapy water. Rinse them completely with clean hot water to remove any soap residue. Place your clean jars in a large pot of warm water or inside your pressure canner to keep them warm while you prepare the meat. Keeping jars warm prevents the glass from cracking when hot food or heat is applied later.
Step 2: Trim and Cut the Chicken Breast
Place your fresh boneless skinless chicken breasts on a clean cutting board. Trim away any excess fat, skin, or gristle using a sharp kitchen knife. Cut the meat into uniform bite sized cubes measuring roughly one inch to one and a half inches. Cutting the pieces evenly helps ensure that every chunk cooks thoroughly and evenly during the canning process.
Step 3: Pack the Jars Using the Raw Pack Method
Carefully remove your warm glass jars from the water bath and place them on a clean kitchen towel. Using clean hands or food tongs, pack the raw chicken cubes tightly into each jar. Press down gently as you fill the jar, leaving exactly one inch of empty space at the top, which is called headspace. Do not add any liquid if using the raw pack method, as the chicken will create its own rich natural broth while cooking under pressure.
Step 4: Add Salt and Seasoning
Add one half teaspoon of canning salt to each pint jar, or one full teaspoon to each quart jar. Canning salt or pure sea salt is best because standard table salt contains anti caking agents that can make your jar broth look cloudy. The salt is purely for flavor, so if you are watching your sodium intake, you may reduce or completely skip the salt without affecting the safety of the recipe.
Step 5: Clean the Jar Rims Thoroughly
Dip a clean paper towel or cloth into a small bowl containing white vinegar or lemon juice. Carefully wipe the top rim of every glass jar to remove any grease, meat juice, or tiny bits of food. Ensuring a perfectly clean jar rim is critical because any tiny smudge of oil can prevent the rubber gasket on the lid from making a tight airtight seal.
Step 6: Place Lids and Adjust Bands
Center a clean flat canning lid over the top rim of each jar. Screw the metal ring band over the lid until it is finger tip tight. This means turning the band until you feel light resistance, then giving it just a gentle extra turn. Do not tighten the bands too hard, as air must be allowed to escape from inside the jar during pressure processing.
Step 7: Load and Prepare the Pressure Canner
Pour about two to three inches of warm water into the bottom of your pressure canner, according to the manufacturer guidelines. Set the filled glass jars upright on the rack inside the canner, ensuring they do not touch each other directly. Place the canner lid on top and lock it tightly into position according to your specific model instructions. Leave the steam vent pipe open.
Step 8: Vent Steam and Build Pressure
Turn your stove burner to medium high heat to bring the water inside the canner to a steady boil. Watch the steam vent pipe carefully. Once a steady stream of steam begins escaping from the vent, set a timer for ten full minutes. Allowing steam to vent for ten minutes purges all cold air from the canner so that heat is distributed evenly. After ten minutes, place your pressure regulator weight or gauge onto the vent pipe.
Step 9: Process the Jars Under Pressure
Allow the pressure inside the canner to rise to ten pounds of pressure for a weighted gauge, or eleven pounds for a dial gauge, adjusting for your local altitude if necessary. Once correct pressure is reached, start your processing timer. Process pint jars for 75 minutes, or process quart jars for 90 minutes. Regulate your stove heat carefully throughout the entire time to maintain steady, continuous pressure.
Step 10: Cool Down Naturally and Store
When the processing time finishes, turn off the heat completely and move the canner off the hot burner if possible. Let the pressure drop to zero naturally on its own without removing the weight or running cold water over the pot. Once depressurized, carefully remove the lid, take out your jars using a jar lifter, and set them on a towel lined counter for 24 hours. Listen for the satisfying pop sound that confirms a successful airtight seal. Check seals the next day, remove metal rings, wipe jars clean, label them with the date, and store them in a cool dark pantry.
Why This Recipe Is Special
This home canning chicken breast recipe stands out as a true superstar in home culinary management. Unlike commercial canned products that often hide unwanted additives, excess water, starch fillers, and artificial chemicals, your home preserved chicken contains nothing but fresh meat, optional pure salt, and its own rich juices. You control every single ingredient from start to finish, guaranteeing high food quality and ultimate nutritional purity for your entire family.
From a nutrition and health standpoint, lean chicken breast offers an abundance of complete dietary protein, essential B vitamins, phosphorus, and selenium while remaining extremely low in dietary fat and carbohydrates. This makes it an ideal staple for low carb diets, keto routines, fitness meal prepping, and health conscious households. Cooking the meat directly inside sealed jars locks in every bit of natural moisture and nutrient richness that might otherwise escape into cooking water or pan drippings during conventional roasting or boiling.
The final texture and flavor profile of home canned chicken breast is remarkably tender and rich. The high pressure processing breaks down tough muscle fibers completely, resulting in meat so soft that it shreds effortlessly with a simple fork. The chicken sits in a delicious homemade broth generated naturally during cooking, giving it a deep, comforting, savory taste that transforms simple weeknight meals into heartwarming culinary experiences.
Extra Tips for Better Taste
-
Add dried herbs like thyme, rosemary, garlic powder, or black pepper to each jar along with salt for customized ready to eat flavor profiles.
-
Use hot homemade chicken broth instead of raw packing if you prefer a hot pack method, which yields slightly firmer meat texture.
-
Save the flavorful broth left inside the jars after removing the meat to craft incredible rich pan sauces, gravies, or rice dishes.
-
Add a small slice of fresh onion or a small piece of celery to the top of each jar before sealing for an extra layer of savory taste.
-
Always allow jars to rest undisturbed for a full 24 hours after canning so seals set completely without liquid loss.
Final Thoughts
Learning how to can chicken breast at home is an empowering skill that connects you with traditional food practices while serving your modern busy life. Having rows of gleaming glass jars lined up in your pantry fills you with pride and relieves the daily stress of deciding what to cook for dinner. It saves money, reduces food waste, and supplies your body with clean wholesome protein whenever you need it. Gather your canning supplies, follow these simple steps, and enjoy the wonderful comfort of homemade food security.
Nutrition Details
| Item | Value Per Serving (1/2 Pint / 100g) | Total Recipe (10 lbs Chicken) |
| Calories | 110 kcal | 4950 kcal |
| Protein | 23 g | 1035 g |
| Total Fat | 1.5 g | 67.5 g |
| Saturated Fat | 0.4 g | 18 g |
| Carbohydrates | 0 g | 0 g |
| Dietary Fiber | 0 g | 0 g |
| Sodium | 250 mg | 4500 mg |
| Cholesterol | 55 mg | 2475 mg |
Disclaimer
Everyone’s body, health conditions, and dietary requirements are different, and individual nutritional results may change based on specific ingredients used. Always consult with a qualified healthcare professional or nutritionist regarding personal diet plans, health goals, or medical advice. Ensure you follow approved home canning guidelines and safety manuals for your specific equipment to guarantee food safety.